시카미 트랙 사용 방법 "과 관련된 조항
GRISC index explanation
In this article we will be adding information regarding our GRSIC route difficulty index.
Subjetivity of a route's difficulty.
The first thing is to indicate that the difficulty index is calculated for an average state of fitness, each person depending on their state of fitness can appreciate that for example a route is easier than indicated if their state of fitness is very good, or the opposite, a route that we classify as average, someone who has a low state of fitness may find it difficult.
Difficulty ratings will be calculated for only three types of routes as detailed below:
- Walking Routes
- Cycling Routes
- Running Routes
Activities or plans that do not belong to any of the above types shall not show a difficulty index.
Tpypes of routes according to its difficulty.
The rankings we offer are as follows:
| Very Easy | GRSIC less than 25 | |
| Easy | GRSIC between 25 and 50 | |
| Medium | GRSIC between 50 and 75 | |
| Hard | GRSIC between 75 and 125 | |
| Very Hard | GRSIC greater than 125 |
To calculate the GRSIC difficulty:
For the calculation of the difficulty index we take into account the following data:
- Distance covered on the route
- Elevation Gained
- Elevation Lost
- Altitude of the route
Share a route
Sharing activities
We know that sometimes you may like to share with others a route you have done, or a plan you are going to do in the future.
Here are some of the ways to do this.
Share a 3D route animation
In the following video, you will see the basic way to share a Sicami route. Please note that the privacy of the route must be set on Friends or Public for you to be able to share it.
First, let's see how to share a 3D animation.
How to share a view / 3D animation on Android
Share an activity or plan
Now we will see how to compare a route (Activity or Plan). As you will notice, the procedure is the same.
About types of activities
Types of activities
We will explain in this article how to change and predetermine the type of activity (cycling, hiking, walking, trekking, etc.) for our activities and plans in Sicami.
The type of activity will be useful to be able to carry out searches later, filtering by this data; and, for example, for power calculations, especially in cycling, since the values will change depending on whether it is a Mountain Bike or a Road Bike.
Activity type configuration
This video explains how to configure the type of activity for a specific activity or plan:
Modify activity type for a plan
Default activity type
This video explains how to configure the type of activity that will be assigned by default in new activities and plans:
How to modify default activity type for all activities or plans
Sync with Strava
Importation of activities from Strava
In this article, we will explain how to import into Sicami activities those you already have in Strava.
There are two ways to do it:
1. Manually: selecting the path we want to download.
2. Automatically: we configure so that Strava activities are automatically downloaded to your Sicami account.
In both cases it is necessary to previously have an account in Sicami, if you still do not have one, sign up at: Register.
It is also important to indicate that the privacy that you have specified in Strava is the one that will be used in Sicami. If an activity in Strava is public, in Sicami it will also be so.
Demonstration videos
1. Manually: selecting the path we want to download
The following video explains how to do it:
How to download activities from Strava manually
2. Automatically: we configure so that Strava activities are automatically downloaded to your Sicami account.
Sicami will check every 15 - 30 minutes approximately if you have new activities to download in your Sicami account.
The following video explains how to do it:
Your Stats
Data analysis
In this section, you can see the evolution of data that will help you understand the progress of your performance.
Information is displayed based on the time period you select. The graphs will help you quickly check your evolution.
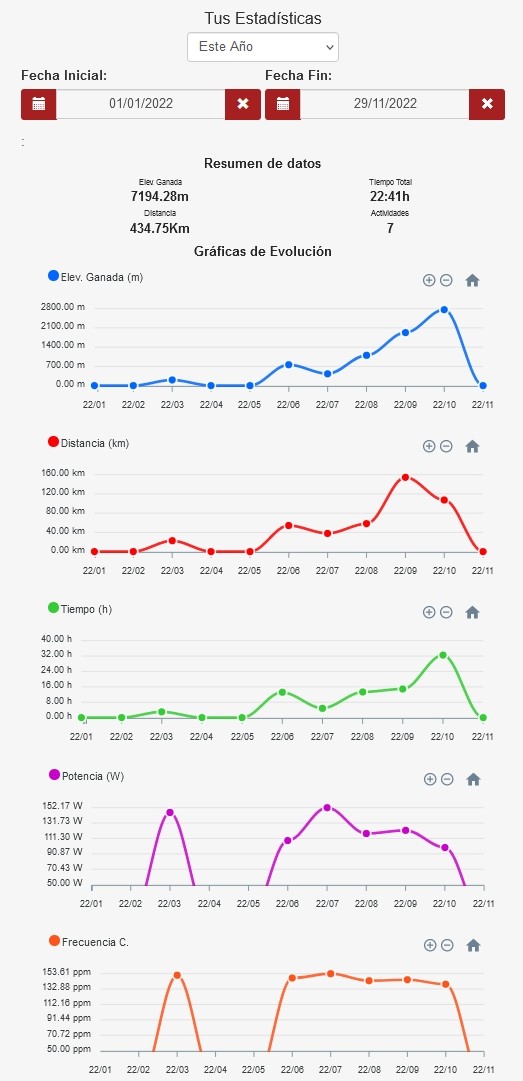
In addition to selecting a period, you can also choose a start and end date to view the period of time you want to examine.
If you are one of those people who seek to improve every day, the statistics section will be very useful, since you will be able to see the evolution of your parameters, what type of training is working for you and what is not. You will be able to make decisions with valuable information so as not to make mistakes.
You can choose to view statistics for the following time periods:
- This Year , which will show you the data for the current year.
- Today , you will see the data of the current day.
- This week , you will see the data.
- Last week , you will see the data.
- This Month , you will see the data of the current month.
- Last month, you will see the data of the past month.
- Last three months , you will see the data of the last three months.
- Last six months , you will see the data of the last six months.
- Last Year , you will see the data of the past year.
- Last two years , you will see the data of the last two years.
- Last three years , you will see the data of the last three years.
You can also manually select a start date and an end date to choose the period for which you are interested in checking your activity.
Suggestions
Is there any interesting information for you that we are not offering you? Contact us to assess the possibility of adding it.
Click on the following link and start enjoying your statistics now.
Oruxmaps and Sicami collaboration
Oruxmaps
We collaborate closely with OruxMaps, which is possibly the most complete Android application for managing online and offline maps, ideal for hikers, cyclists and sporty navigators.

Still don't know OruxMaps?
Some of the features of the integration with OruxMaps
- Sicami is compatible with the following versions of OruxMaps GP v10.0.0
- OruxMaps GP v10.0.0 and higher
- OruxMaps 9.7.0 Beta 18 and higher
- Routes made from OruxMaps can be automatically exported to Sicami.
- Routes that are in Sicami can be loaded in OruxMaps.
- From OruxMaps you can search for Sicami routes.
- The routes that exist in Sicami can be loaded in OruxMaps to follow them.
- With the OruxMaps Live Track function you will be able to see from Sicami your location and that of the people / friends who have authorized it.
How to activate communication with Sicami?
It will be necessary from Oruxmaps to accept the migration to Sicami.
When Oruxmaps asks you if you want to accept the migration / data communication with Sicami, you must say yes.
In the event that by mistake you say that you do not want to accept the migration, you can go to:
- Configuration -> Integrations -> OruxMaps/SICAMI, then click on Enter OruxMapas / Sicami.
- If you already had an account in Oruxmaps use the "Enter" option
- If you did not have an account in Oruxmaps use the "Register" option
- Accept migration to Sicami
- Enter the necessary data and finish the registration process
- Please check if you receive an email after this in case you need to confirm that you are the owner of that email address.
Possible communication problems with Sicami:
- These credentials do not match our records: The problem is that the username and/or password used are not correct in Sicami.
- User not logged in (or incorrect password): The problem is that the username and/or password used in Oruxmaps is not the same as the one used in Sicami.
- Error 34: The password stored in Oruxmaps does not match the one used in Sicami.
Log out or change password in Oruxmaps.
To close the session or connection with Sicami from Oruxmaps you can do the following:


Automatically upload to Sicami (this will affect all the new routes you save, not the existing ones).
Go to Configuration -> Integrations -> Configuration -> Integrations ->Upload Automatically and check OruxMaps/SICAMI.
- You can select the privacy of the routes you upload and if you want the images to also be uploaded here: Configuration -> Integrations -> OruxMaps/SICAMI
- Note that this will only upload new routes that you record since you have activated these options.
Manually upload to Sicami
You can also manually upload the routes to Sicami, from the list of Track/Routes, clicking on one of them, then on "Properties", menu at the bottom left, "Upload to" and click on "Oruxmaps/SICAMI".
Search routes in Sicami
##publi##
Go to Track/Routes, after this click on the image of your avatar or on the image "S" of Sicami if you do not have an avatar.
The list of routes shown are routes that are in Sicami,
- If you click on one of the routes you can choose between seeing the details of the routes or downloading it in Oruxmaps
- If you click on the magnifying glass you will be able to see the routes directly in Sicami and use the sicami magnifying glass to filter the data.
- When you are viewing the route you want to upload to Sicami, click on "Share" and "Open in Oruxmaps
You can also make a long press on any point on the Oruxmaps map and select the option "Search Routes on Oruxmaps / SICAMI servers" from the menu that will appear.
Quick guide and symbol legend
Youtube videos
Youtube playlist of explanatory mini videos:
Activities and plans
We explain some basic concepts of the use of Sicami.
What are Activities?
The following link explains the main differences between the activities and plans on the Sicami Tracks website.
Information on Activities and Plans .
What are the Plans?
Here we offer you information about the plans
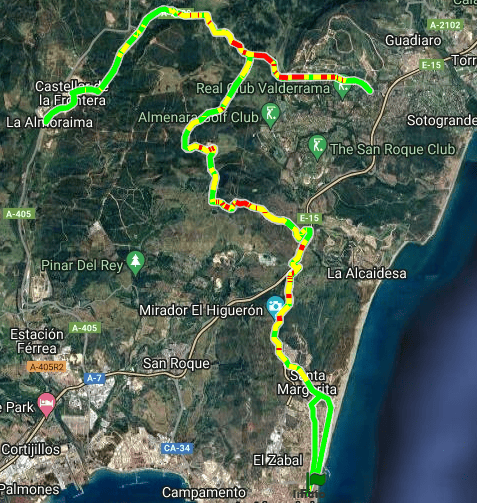
Color a route based on a data.
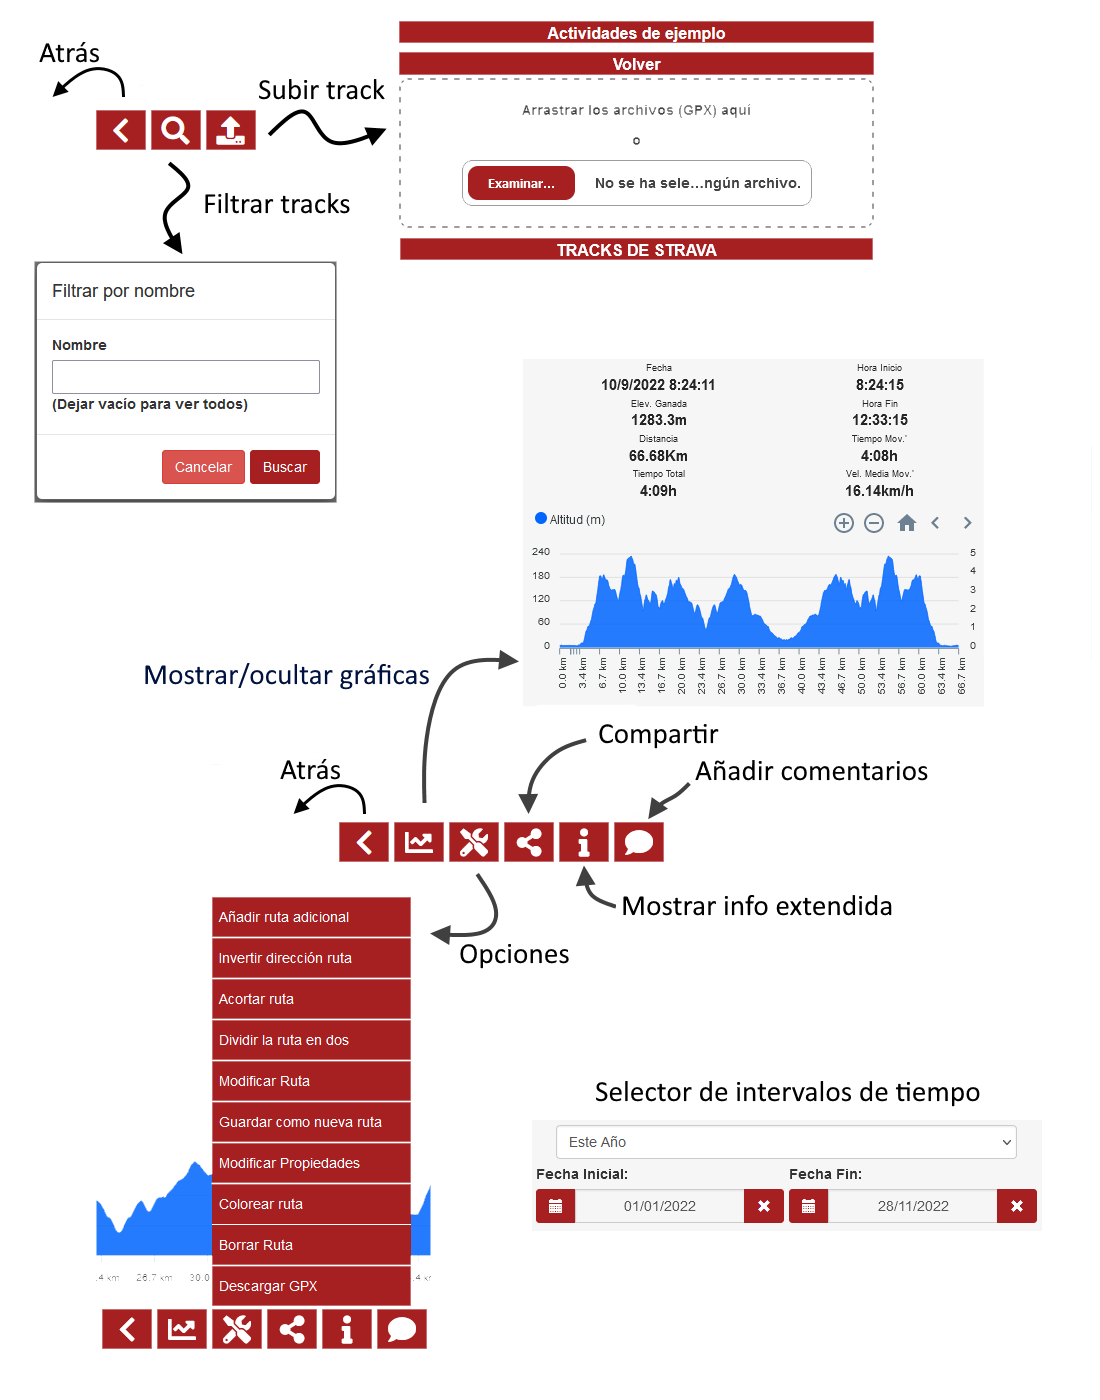
You can color a route based on a parameter. When you are viewing an activity or plan, from the Tools button  select the "Color Route" option, the route coloring options will be displayed.
For example, you can choose the parameter / value "Heart Rate", then you can choose the range of the three available colors to define which color to show depending on each leg of the route.

This will make you see the route with colors in each section based on your heart rate as shown in the following image:
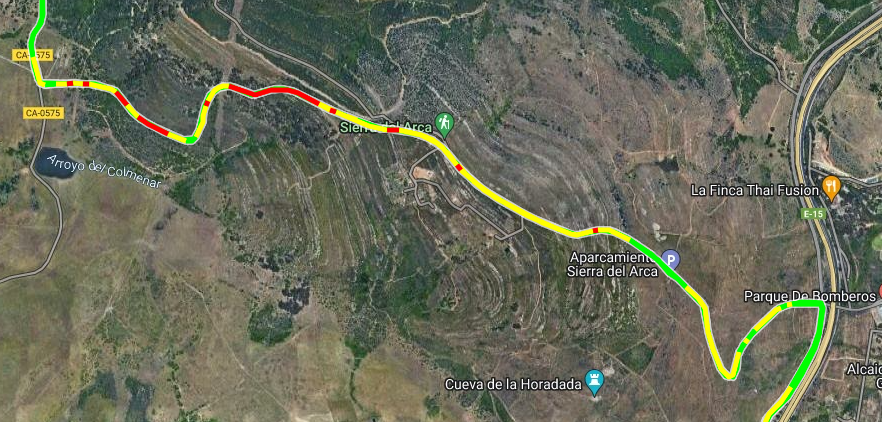
If you zoom in on the map you can see that you will have very interesting information to check how your body behaved on a climb, for example.
Also on the elevation graph of the route will appear a line with the selected parameter (in example the heart rate)
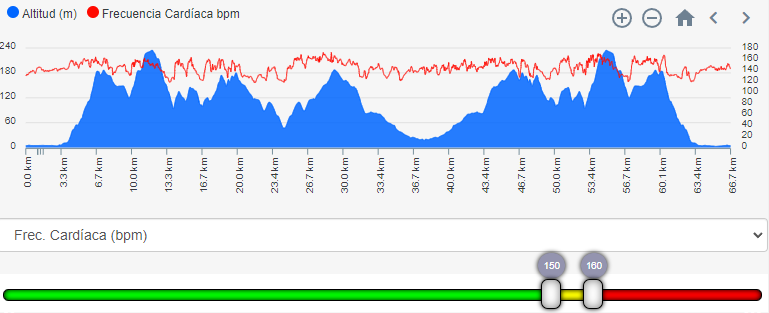
You can make the line of the route be colored based on one of the parameters altitude, speed, slope, cadence, heart rate, power (W), in a short time we will add more parameters.
Stadistics
Stadistics Visualization .
In the stadistics section you will have accumulated and summarized information of all the activities you have carried out.
You can go to the statistics section by clicking this link Stadistics .
How to modify an activity or a Plan.
In the article at this link we give you more information on how to do that. Explanatory manual on how to modify Activities and plans
Add friends .
In the top menu, see the "My Friends" option, from that screen you can generate a link to send to someone and when you accept it, this person will be your friend.
Privacy options.
When you make a route or prepare a plan, you can assign it three levels of privacy / visibility:
Private : Only you can see it
Friends : Can be seen by your friends
Public : Anyone with a Sicami account can see it
In addition, in "My Account" - "Modify my data" you can set a default level of privacy for your new routes and plans
Real Time Map Manual
Location of travel friends
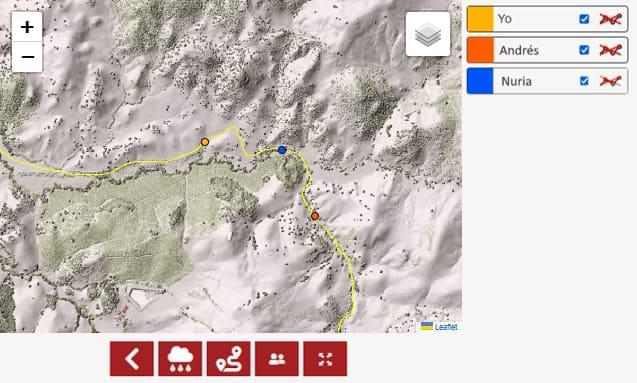
With the real-time map function you can see the location of your friends on the page at all times Real-time Map.
This function can also be very useful when you go out alone, and you want someone with access to your username and password from the Sicami Tracks website to be able to see your location at all times. In the event of any mishap, someone will know where you are, and if you need help you can receive it much faster.
Sicami Configuration
The first thing would be to add friends, you have to go to "More" then click on "My friends" copy the link to send it to whoever you want to be your friend and have them accept the friend request. The other person can do the same and you accept the friendship.
For each friend, the eye button is used to indicate whether or not your friend can see your position on the Map in Real Time. The uncrossed out eye indicates that he can see it, the crossed out eye that he cannot see it.
Share location with Oruxmaps
For your and your friends' location to be visible on the map in real time, you and your friends must use OruxMaps, and it must be configured correctly to share the location with friends. It is the Oruxmaps application that sends your location and that of your friends. Oruxmaps, in addition to sending the location, will receive information about where your friends are and will show it on the screen.
The following link shows how to configure Oruxmaps to share location:
https://tronpoonpo.blogspot.com/2021/07/multitracking.html
The procedure of adding friends from Oruxmaps is not necessary if it is configured from Sicami as we have explained previously.
Choose the visibility of each friend
In the side panel of this page you can select which friends to see and which not.
Privacy
Thinking about your privacy, keep in mind that you will only be able to see the location of people who have accepted you as a friend, and also who have authorized you to see their location.
Visibility, ratings, comments and friends
Plan and share
Share your routes with your friends and plan activities with them. It will be more fun, more motivating and it will also provide you with security in the event of any eventuality along the way.
Add photos and comments to your routes, tell about your experience and provide information of interest to all those who want to travel it.
Comments
Find out before making a route by reading the comments and opinions of other users and seeing the rating you have obtained according to the evaluations received.
Knowing the opinion of the rest of the users will allow you to choose the route that best suits your state of form, the time available or the planning of your training.
Rate
Evaluate and score your routes according to your experience and help other users in their planning.

Privacy
When you make a route or prepare a plan, you can assign it three levels of privacy / visibility:
Private: Only you can see it
Friends: Can be seen by your friends
Public: Anyone with a Sicami account can see it
Real Time Map
Puedes utilizarel Real Time Map to know the current location of your companions, so that no one is left behind!
From the real-time map you can select the friends whose location you want to see in the side panel by selecting the ones you want.
The Map in real time is also very useful when you go out alone, without company, and you want someone who has access to your Sicami account to be able to see your location at all times in case they need to help you at any time.
Manual Activities and Plans
Activities
The activities are outdoor sports or leisure actions that you have already done and have recorded using a route recording device or application, it may also be that you have downloaded it from Strava.
Activities vs plans
The difference between activities and plans is that activities are generated from a route recording device or application and plans are generated from a route design application.
Summary of the information
Both in the activities and in the plans you will see a summary of the information of the activity or plan, total kilometers, elevation gain, total time, etc.
Coloring route based on a parameter
See the route colored based on a parameter. You can make the route line color based on one of the selected parameters, altitude, speed, gradient, cadence, heart rate, power (W).
Rate the route
When you view an activity or a plan you can rate it, and depending on the privacy that you have assigned to it, other people will also be able to do so.
Comments
You can also Comment on the activities and plans, and as with the score, other people will also be able to do so depending on the privacy indicated for that activity or plan.
Classify activity or plan
For each activity or plan you can indicate the type of activity to which it corresponds, whether it is running, cycling, mountain biking, etc.
Label activitie
You can label your activities. Create your own labels and add them to the activities to classify them and be able to locate them later. You can assign more than one label to the same activity. Examples of labels would be "With my friends", "Marathon Training", "Highly recommended route", "Don't do it again", and everything that your imagination suggests.
Editing activities and plans
We offer you tools so that you can modify already existing activities and plans and to create new ones . In the article at this link we give you more information on how to do that. Explanatory manual on how to modify Activities and plans
Your privacy is important…
When you make a route or prepare a plan, you can assign it three levels of privacy / visibility:
Private
Only you can see it
Friends
Can be seen by your friends
Public
Anyone with a Sicami account can see it
In addition, in "My Account" - "Modify my data" you can set a default level of privacy for your new routes and plans
When someone other than you views your activity, for reasons of protecting your privacy, both the beginning and the end of the route will be reduced by 400 meters, so that nobody can know your starting and finishing point, which on many occasions can be your home
Plans Manual
A plan is not the same as an activity, activities are outdoor sports or leisure actions that you have already carried out and have recorded using a device or application for navigation and route recording, it may also be that you have downloaded it from Oruxmaps or Strava. On the other hand, a plan is a route that is created or generated using an application for route design, such as Sicami or any other app.
In other words, when a plan is created, it does not correspond to any activity actually carried out, it is created precisely to be used later in a real activity.
The most common is that a plan is created to later upload it to a device or application for navigation and route recording to use it as a route to follow.
The plans will help you plan your future routes correctly, they will allow you to discover the most difficult sections, for example because of their steep slope, you can also see in advance where to plan a rest stop, or to eat.
You can start preparing your plans in this link Plans that will take you to the Plans section.
Modify and Create Activities and Plans Manually
Introduction
Load your gpx files, be they activities or plans and edit them on the map, add waypoints indicating significant places, add useful comments for your friends.
Track editing also allows you to trim a route, invert it (make the iend of it become the start), join two routes, add or remove coordinate points.
Create new routes from scratch, starting from an existing one or joining other existing routes.
The following image shows how to activate route editing:
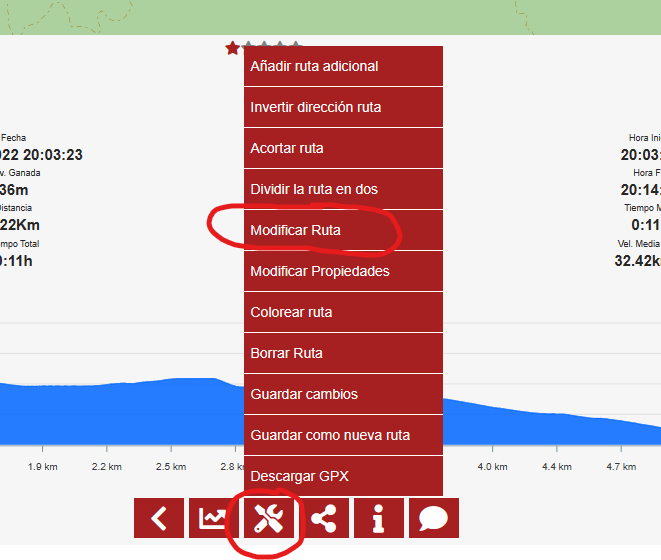 Then, as shown in the following image, we can see the available options:
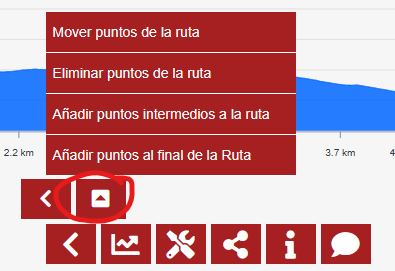
Adding points to the end of the route
When points are added to a route, because we are interested in expanding it, for example, we have two options:
Automatic : When we add a point with the "automatic" option, a passable path line will be drawn between the last point of the route and the one we have just added.
Manual : When we add a point with the "manual" option, a straight line will be drawn between the last point of the route and the one we just added.
We can alternate the use of the two methods, for example it may be the case that the information we use for the automatic layout is outdated and where before there was an obstacle (for example a fence, stone, etc.) that prevented the passage, This will cause the route to not be traced through that point in automatic mode, we can then activate manual mode, overcome that obstacle and later activate automatic mode again.
Adding waypoints
If we want to add points, but not at the end of the route, if not at an intermediate point, we will use the corresponding menu option, we will click on an intermediate area of the route where we want to add a point, and then we will click on the button " Add point".
Later, by activating the option to move points, we can move that point.
Removing points
If we want to remove a point: if the point we want to remove is a point that we have added with the option to add a point at the end of the route, we will simply press the undo button.
If the point that we want to delete is an intermediate point of the route, we will select from the menu (the one in the image above) the option to Delete Route Points, we will click on the route at the point that we want to delete, and then we will click on the delete point button.
Saving changes
When you finish modifying a route you can save the changes to it, be very careful because you won't be able to recover it after doing that. But you can also save the changes to a new activity or plan.
Example of Animation of 3D Routes
Click on the following links to see the animations
3D - Benaojan - Estación de San Roque
3D - Arca - Sotogrande - Castellar y Vuelta
Any route that you upload to Sicami can be viewed animated in 3D.
It is very easy, enter the route, and press the 3D button
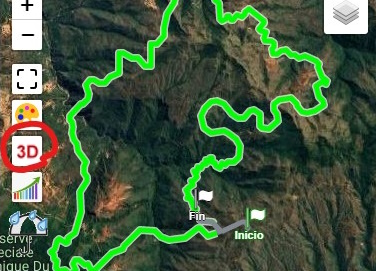
The following video shows how to share a 3D view of a route with whoever we want.
Comparative 3D Routes with more than one track / participant
Click on the following links to see the animations
3D - Comparison of the same users at different times 01
3D - Comparison 3 persons on the same route
Route of 2 participants on a very similar route 01
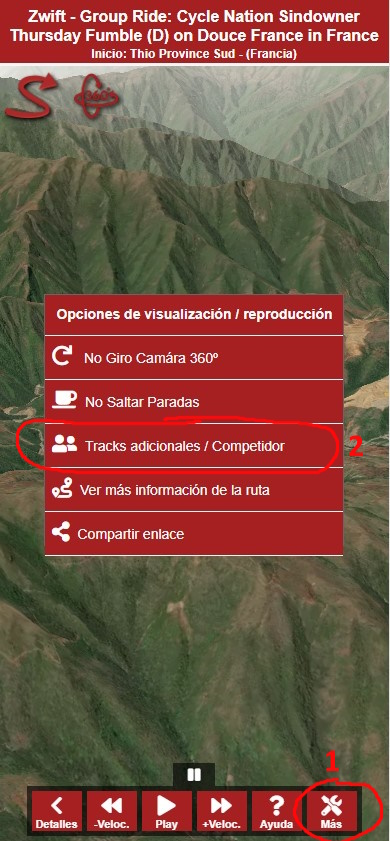
Any route that you upload to Sicami can be viewed animated in 3D.
It's very easy, enter one of the routes you want to compare, and press the 3D button
Add more routes to the 3D view. The routes must be in the same zone and have coincident sections.
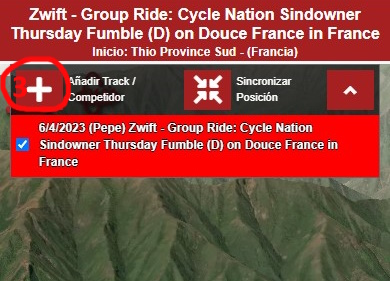
Once you have added the routes that you want to see, you must select a position through which all the routes pass, and that will be considered the starting point. This is necessary because each route will have been saved on different dates, and although they correspond to a departure at the same time by several users, each user could have a different time configured on their recording device, in this way we can synchronize the times. To do this you must press Play to see where each user passes and search for a matching position.

Once you have done all of the above you can press the Play button to start watching the animation.
The following video shows how to share a 3D view of a route with whoever we want.